itp: hypercinema

[ITP: Hypercinema] "Summer Wine" Cornell Box

Group member: Elif Ergin

See my previous blog post about this project here.
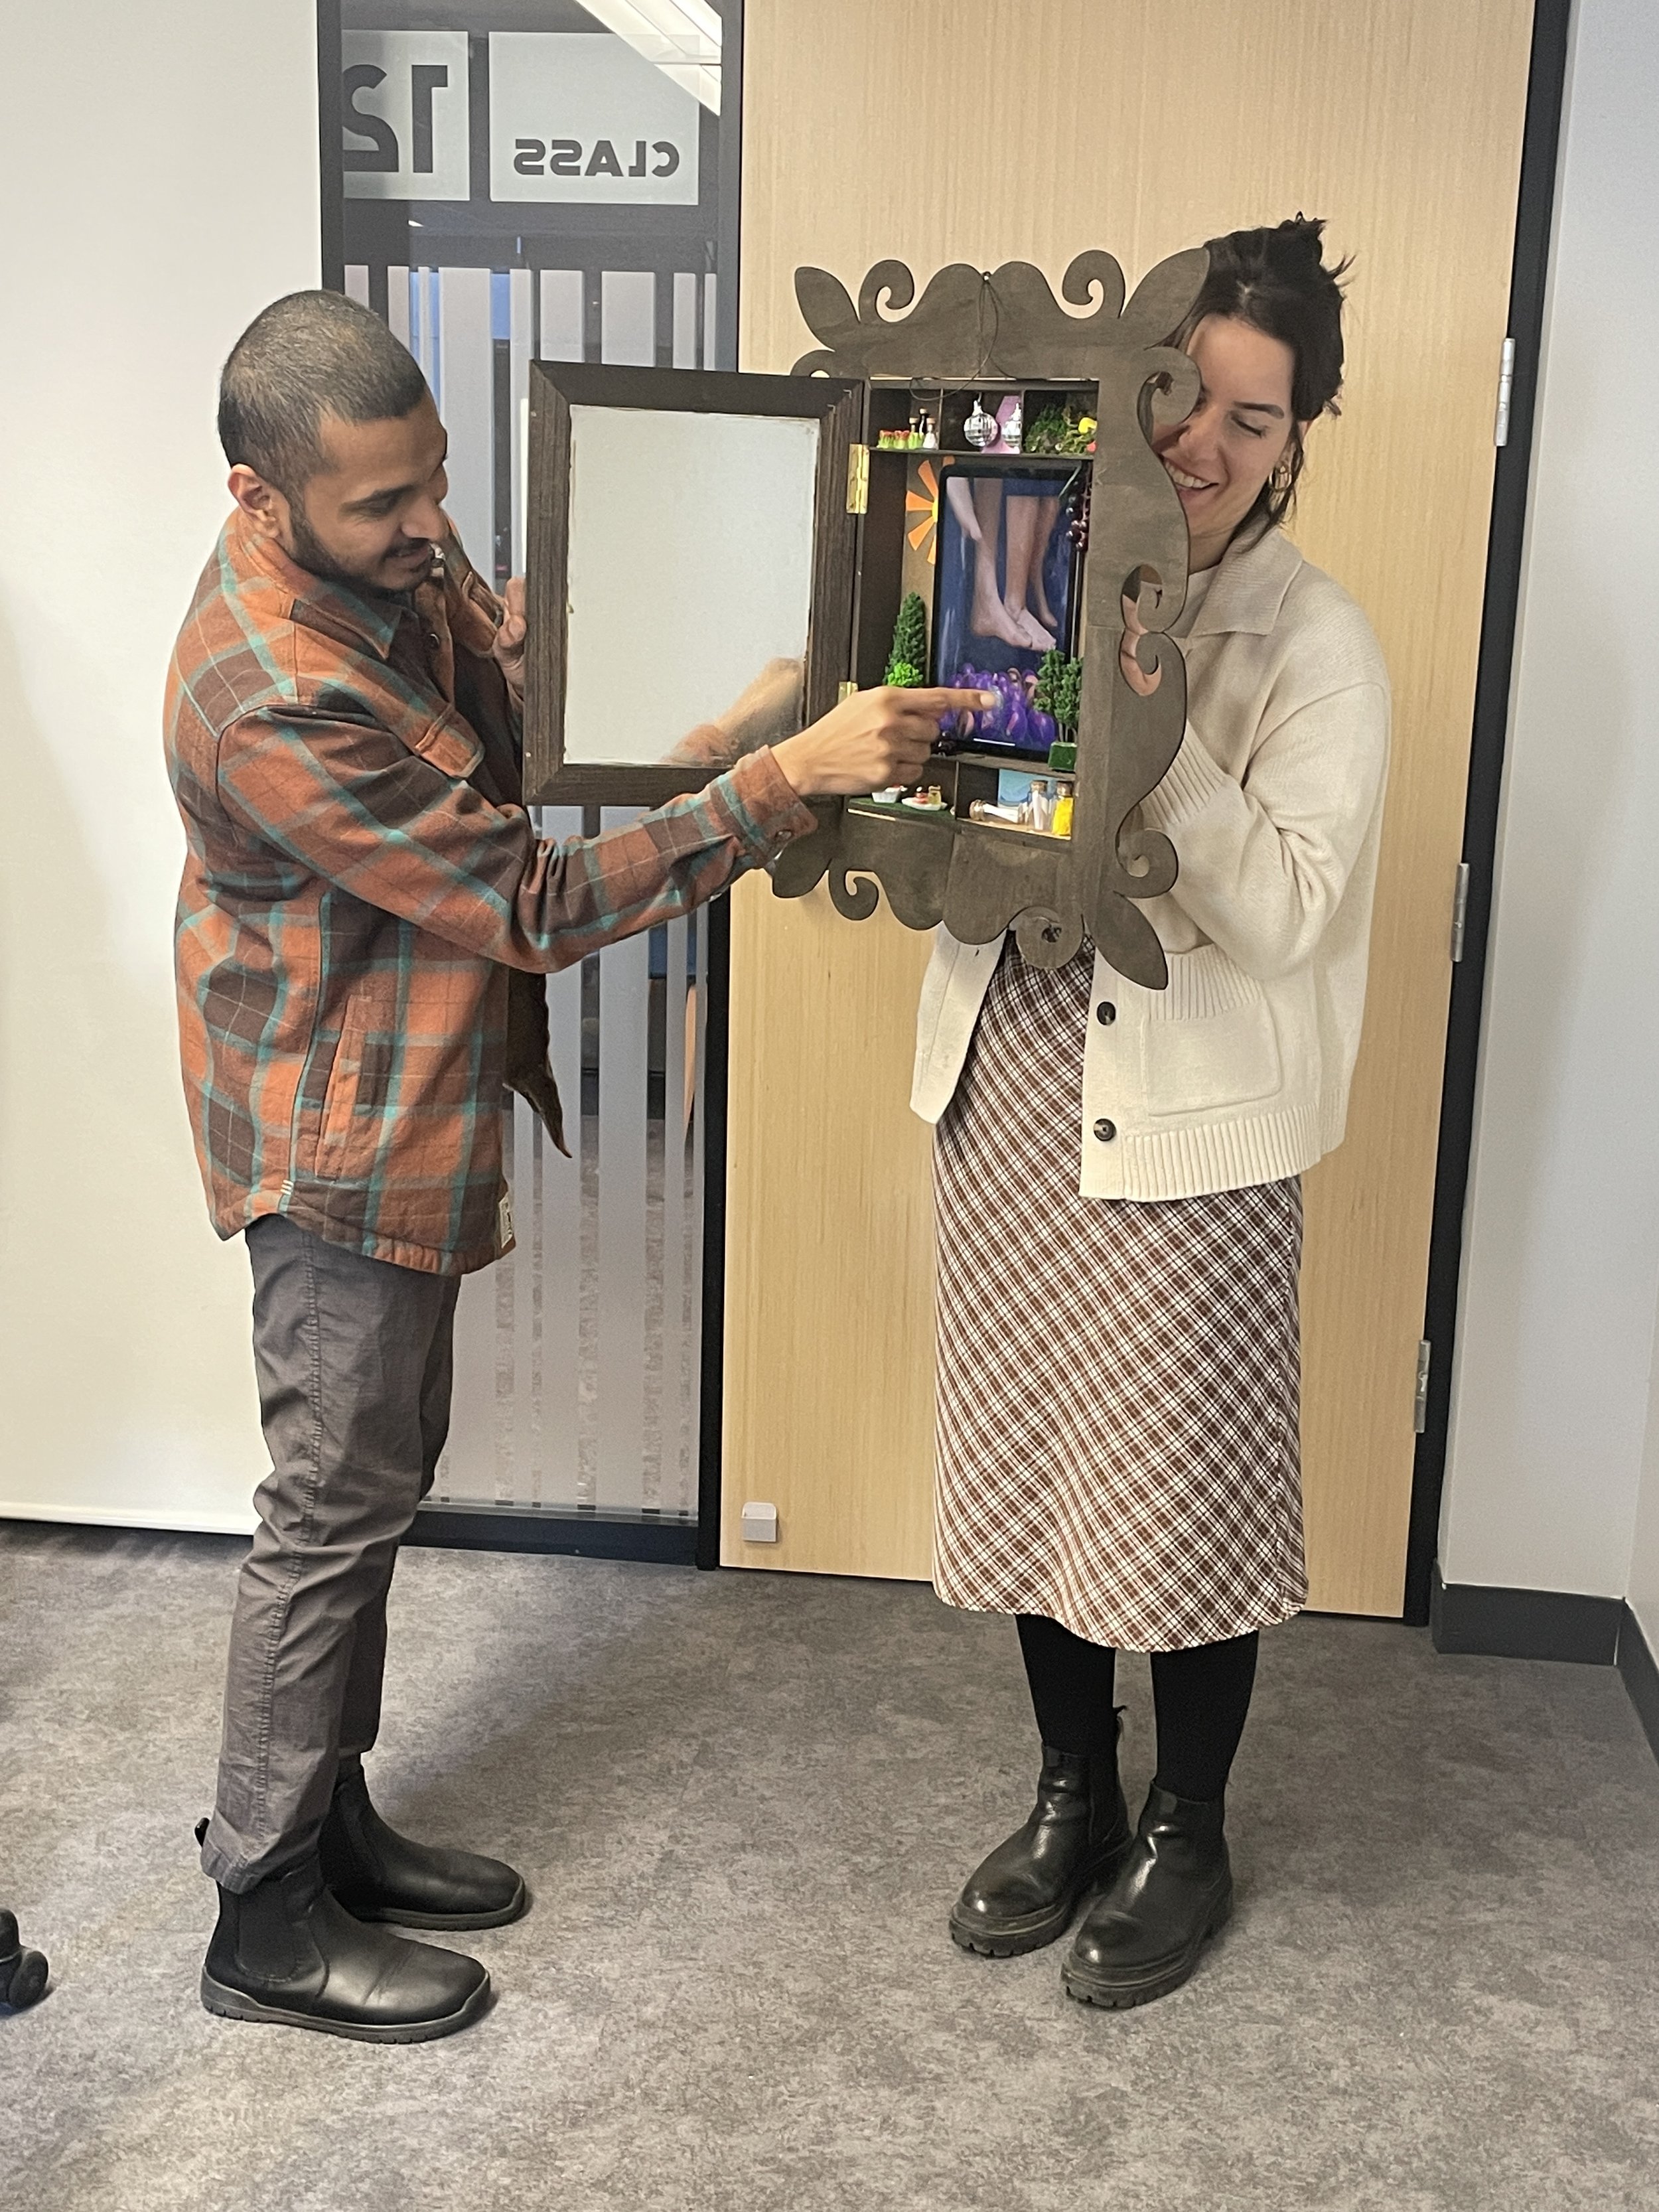
Ideation

Ok, so this project took a weird turn, but it could always be weirder because Elif and my original-original idea was a Zac Efron Cornell Box. So consider yourselves lucky! We kept on thinking about our previously decided theme “summer dream” but no concrete ideas came to mind for what we wanted in our Unity project. What started as a joke ultimately became our project; we were inspired by the song “Summer Wine” and now we are giving our feet pics away for free!

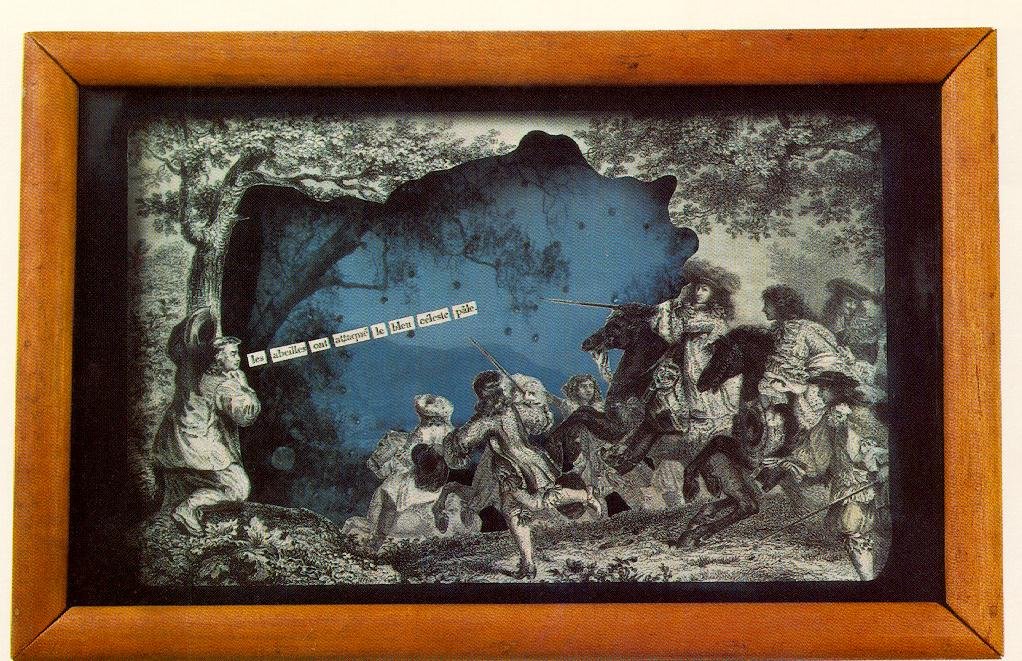
We had done a bunch of research on existing Cornell boxes and it was interesting to see that a lot of different artists made them. We were really inspired by the physical boxes, all their compartments, layered feel, and the use of found objects, so we tried to incorporate some of these aspects in our own piece.

Fabrication

1. Find the perfect box at Michaels.

2. Laser cut embellishments and shelves from 1/8” plywood.

3. Use the orbit sander to remove the burns from the laser cutter.

4. Check that the shelves and the screen (iPad) fit in the box.

8. Reassemble box lid. Install shelves using wood glue. Apply mirrored sheet to glass pane.

11. Assemble!

5. Remove excess saw dust and prep the area for staining all the wood.

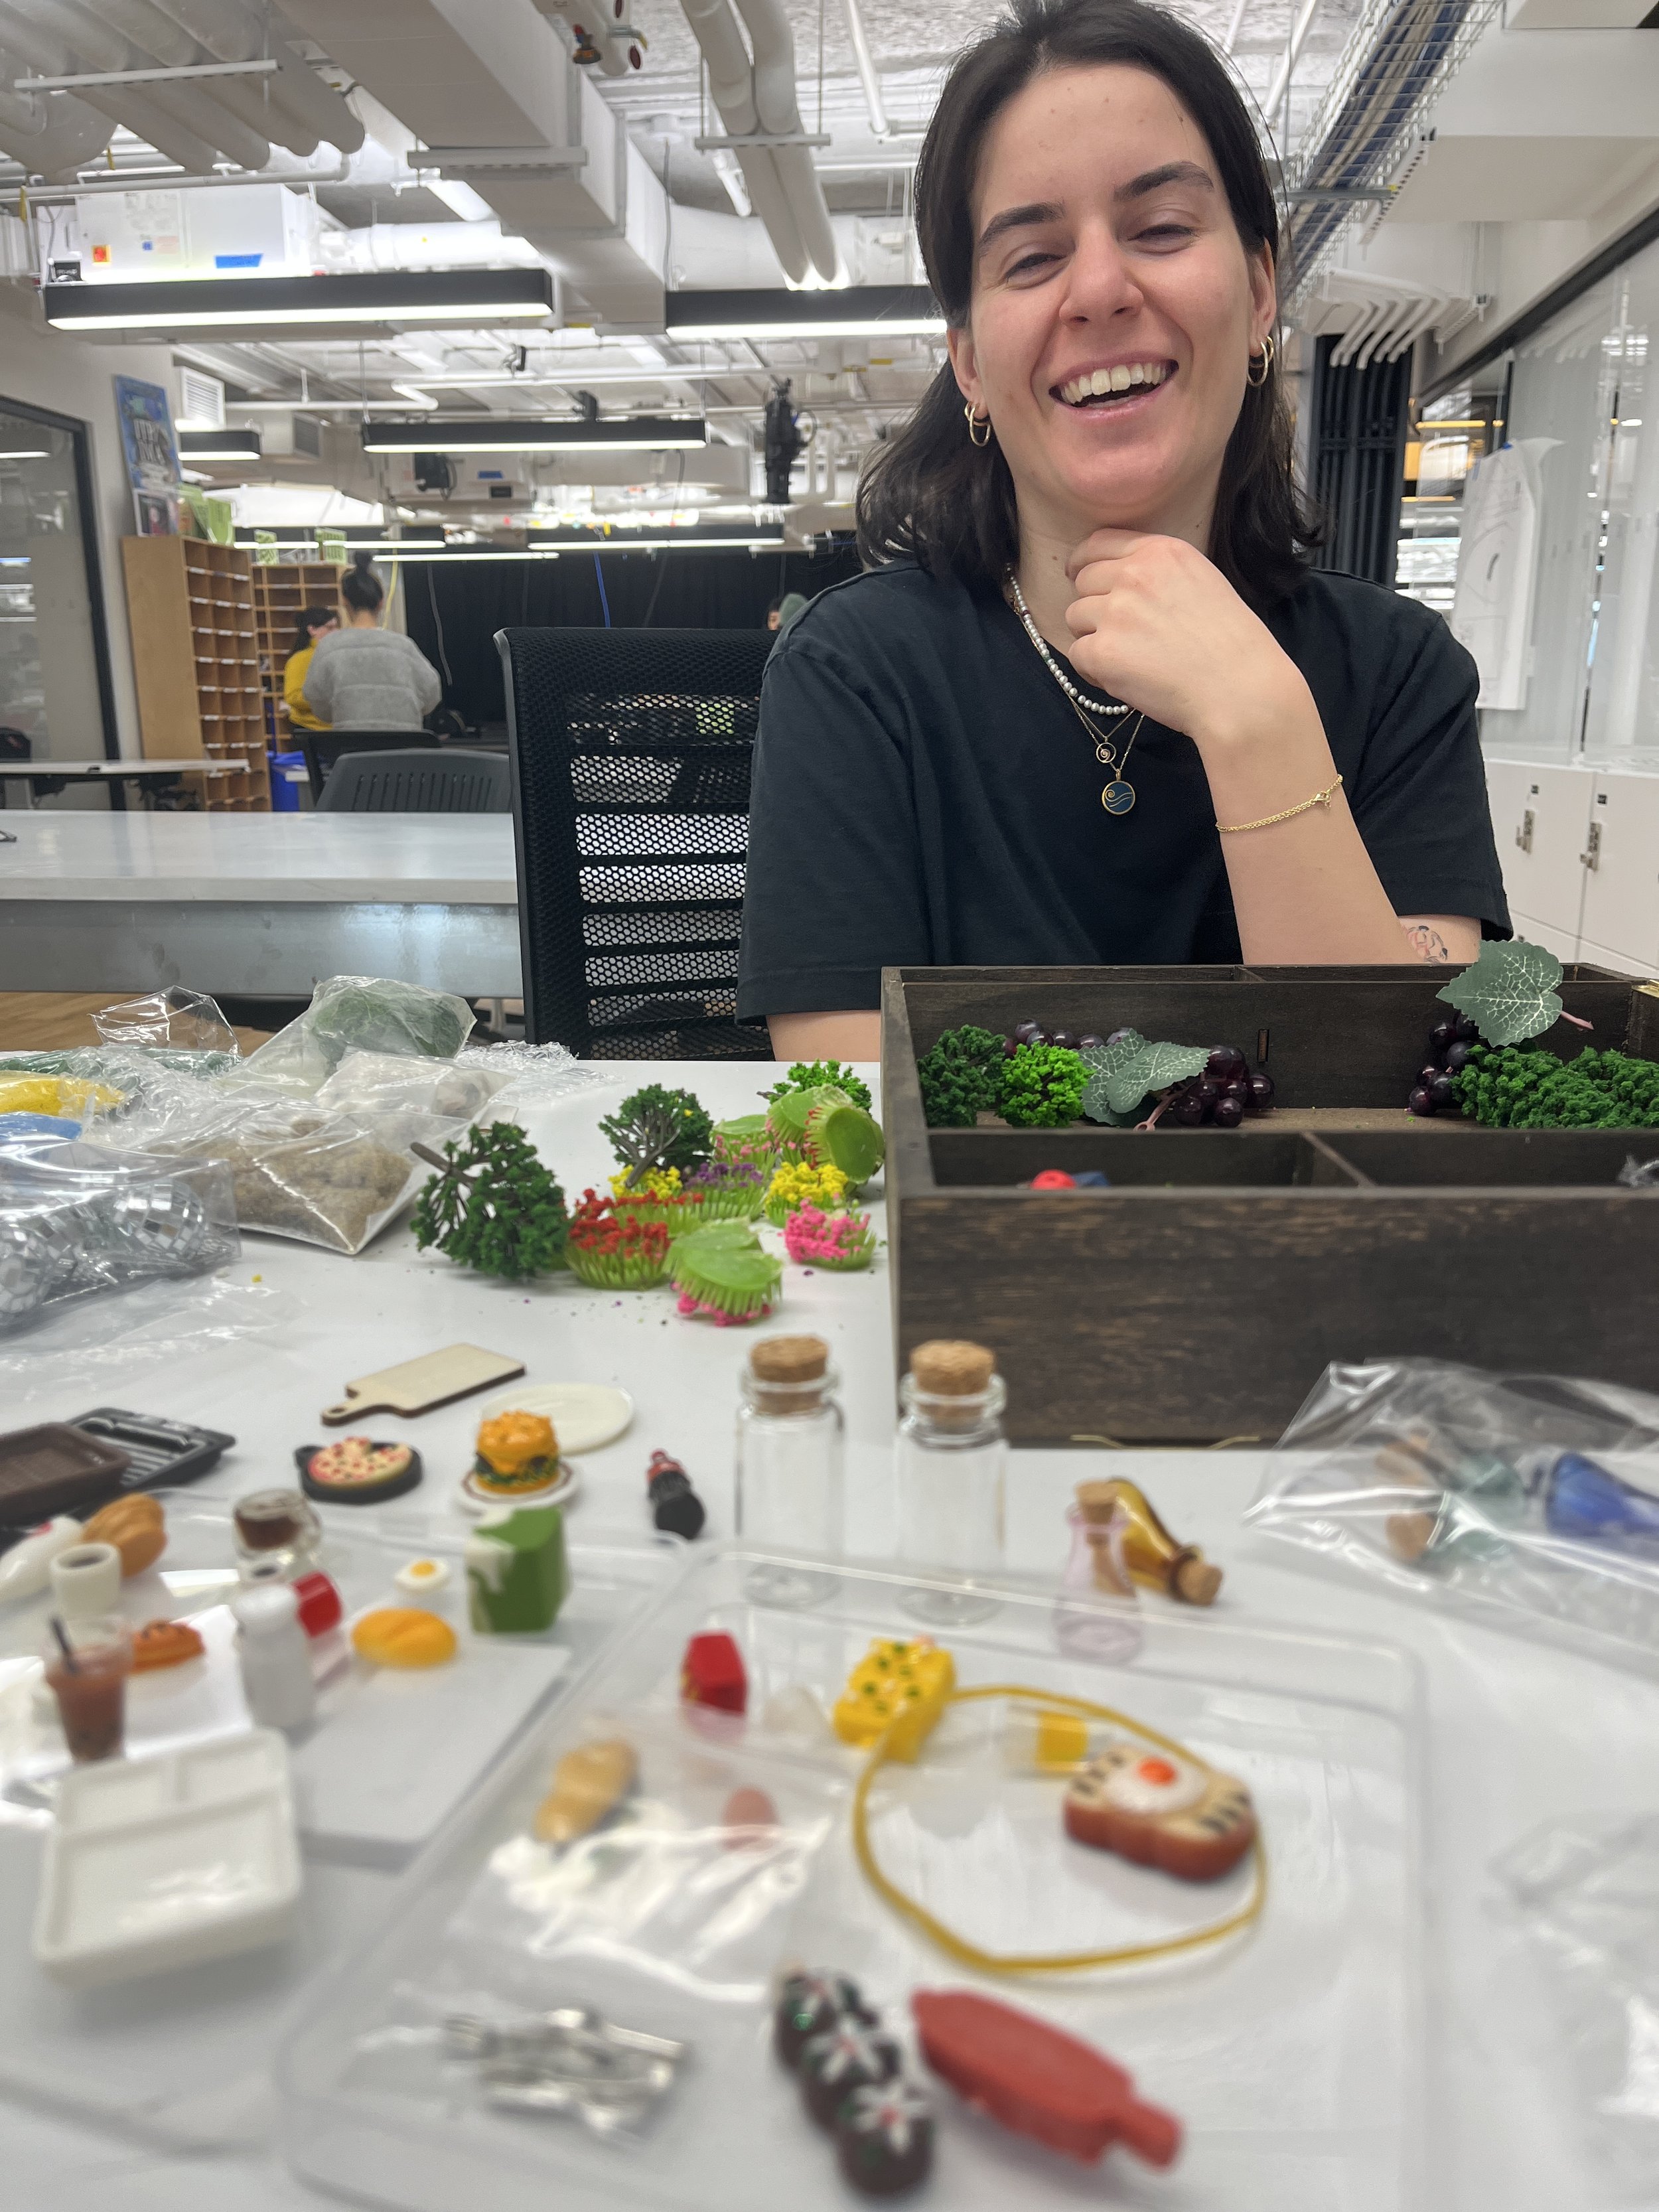
9. Collect all kinds of diorama materials.

6. Stain the frame embellishments.

7. Remove the box lid and stain the wood.

10. Collect all kinds of miniature thingies.

Unity

For the digital Cornell box, I was thinking about the summer wine concept and remembered this coke commercial that I always see when going to the movies. It kind of lead the design of the story of our box.

Collect Assets

Neither Elif nor I had much experience working in Unity before this so we started by rounding up assets for our box and hoping it would inspire the final aesthetic. We searched through the Unity Asset Store for free 3D assets that reminded us of summer. It was also important for us to be a part of our Cornell box so we filmed our own eyes and stomping feet (to make the wine). Elif used the magic of Runway to remove the background from our videos.

Create Basic Box

We used the box asset supplied to us in class and made it the same aspect ratio as the iPad. I found some stock sky footage and used that as our box’s wall paper. Then I went on to make all our different grapes.

I made a standard purple and see-through grape material and parented the spheres to the objects floating inside them so that they would always move together. I also found a disco ball material and Elif helped me wrap our eye videos around other spheres as well.

We also got our feet videos to play on planes in front of our box. I really like the surreal style of the 2D feet existing in a 3D world, I think it’s kind of funny!
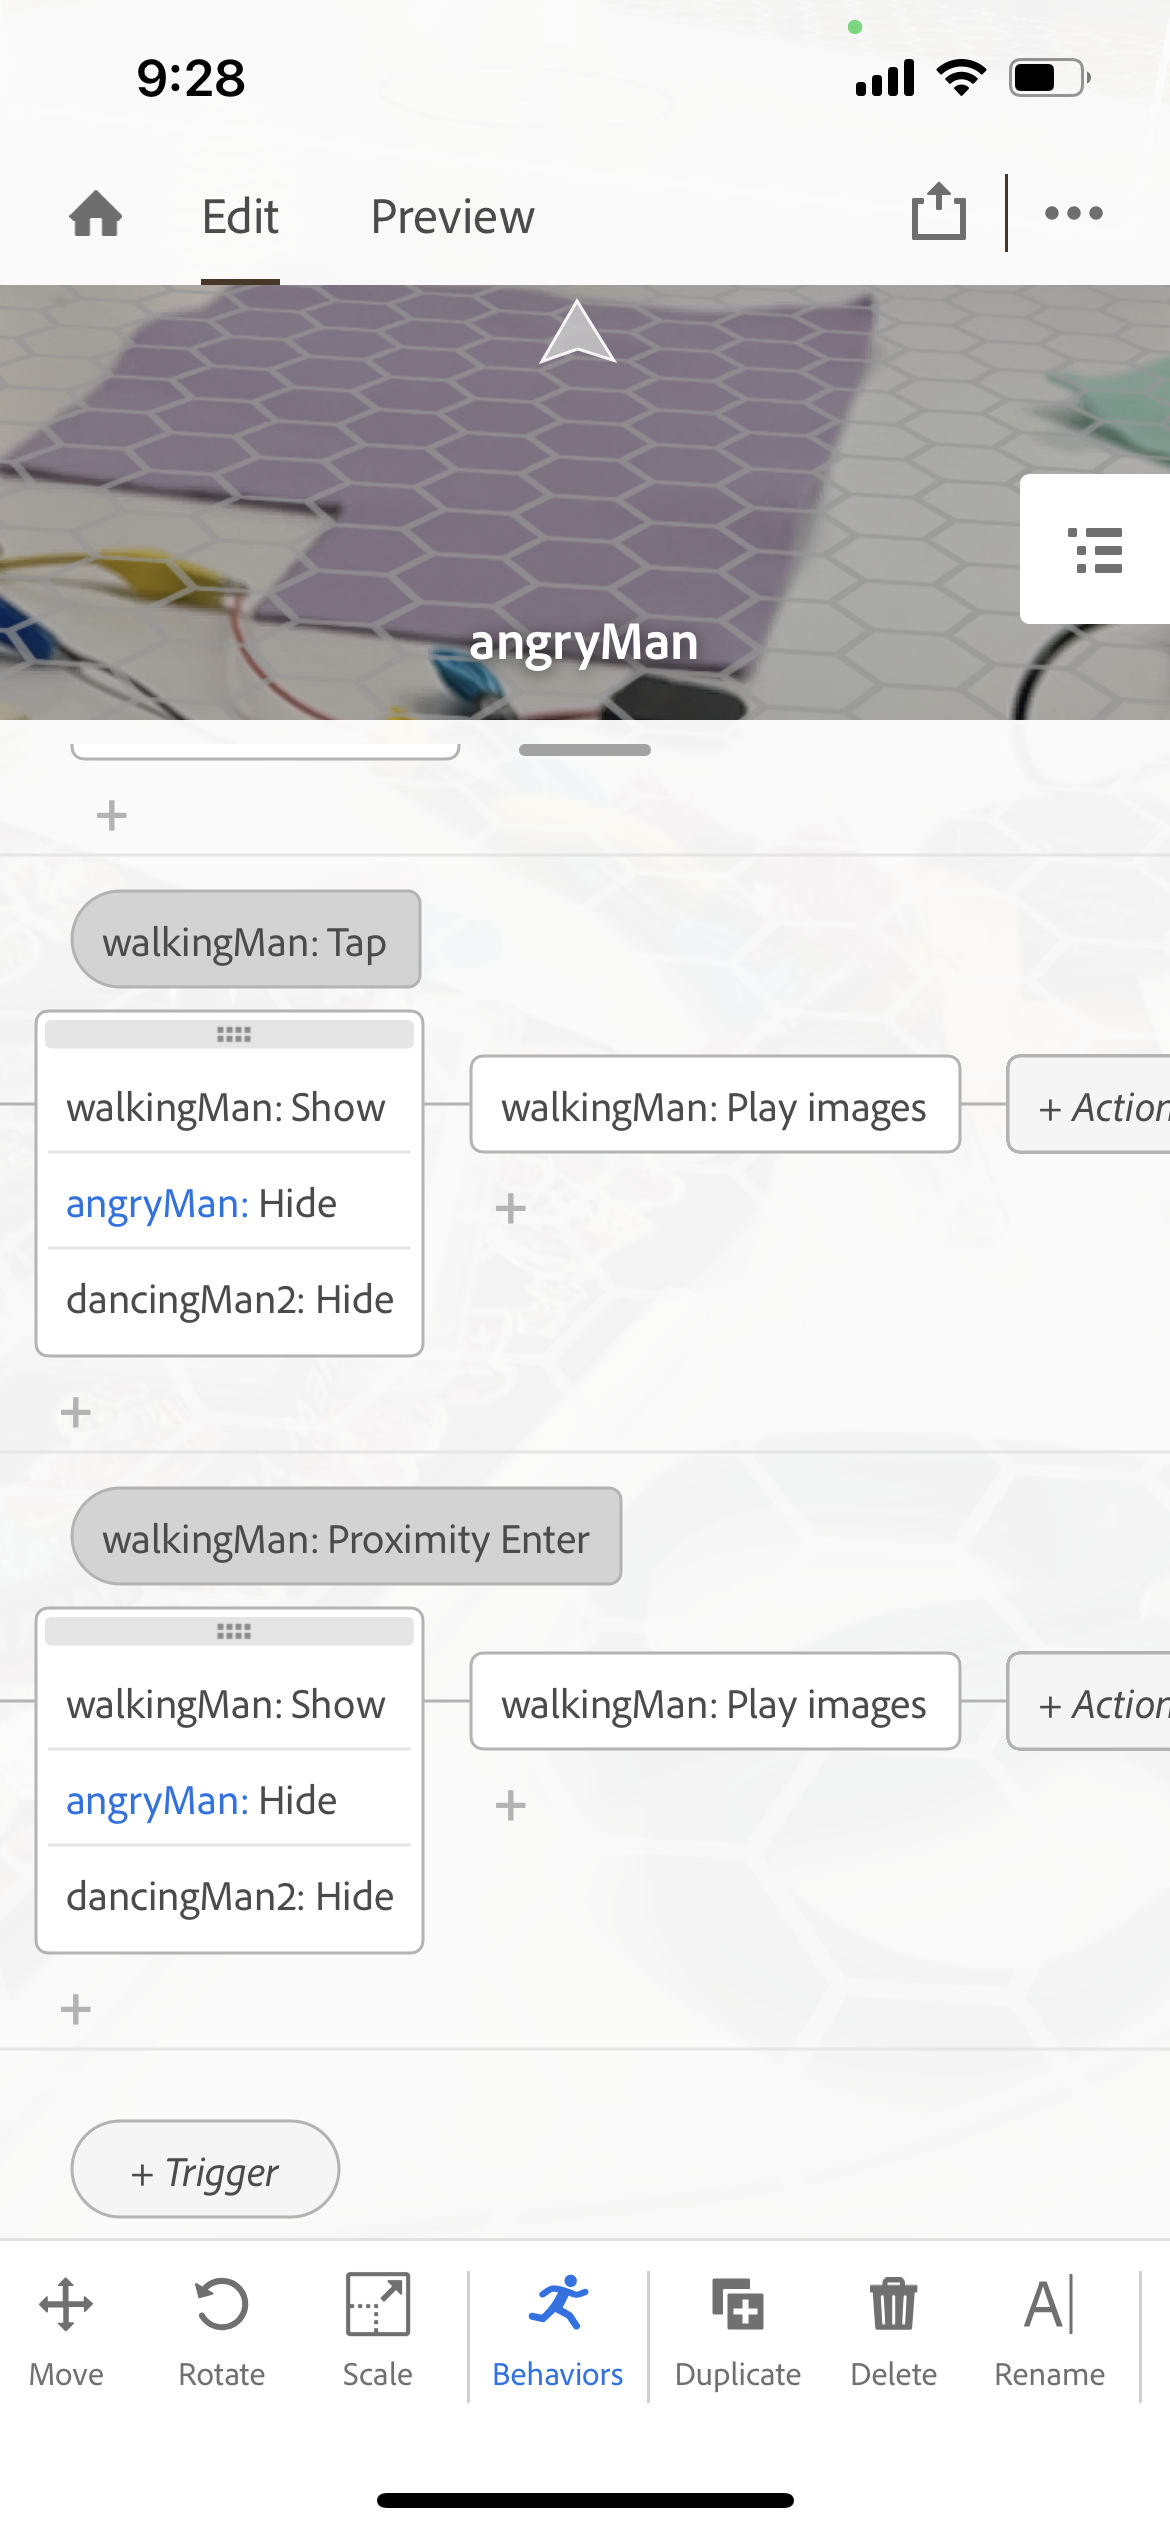
Scripting

Now, on to making things move! I started with the “InstantiationKeyRandomLocation” script we received in class. I changed it so that a grape would spawn on mouse click instead of pressing the space bar. We were hoping the mouse click would translate to an iPad tap once built for iOS and, spoiler alert, it does!

So after getting one grape to spawn I wanted to update the script to randomly choose one of the grapes we created. I found a really helpful video of how to create an array of GameObjects. On click, the script chooses a random location in this array and spawns that type of grape.

After this, we ran into the issue that spawning too many grapes at once will overload computer and crash Unity. I used a destroy timer to delete grapes a given number of seconds after spawning.

I also thought hard about the foot-grape interaction. Obviously, the ideal solution would be to make the grapes look stomped on over time and some liquid wine appear but this was a stretch for us because of our limited knowledge of working in Unity. I thought the easiest solution would be to make the grapes slowly shrink and disappear into nothing so I wrote a coroutine which would scale the spawned grapes in parallel to running the main loop.

Here are the two functions I wrote to get the interactions working for our box:

Finishing touches

We were able to get some office hours with Gabe and he suggested we add some camera effects in post. We learned in class that we had to download the post processing package from the Unity package manager. We added the chromatic aberration effect which added a blurry dreaminess around the edge of the camera and the ambient occlusion effect which darkened the shadows of the box and added some depth.

Lastly we considered the sound of the piece. We both really liked how each filmed video element played its own sounds and how the sounds layered and multiplied when more grapes were generated. In the background we’re just chatting and talking ourselves through the filming process but there are sound clips where we are discussing summer memories. I decided to add a background squishing sound to evoke the grapes being pressed into wine.

Building for iOS

So that we could display our Unity project on an iPad I followed this tutorial to build our project for iOS. The first step is to install iOS build support as shown in the screen capture below.

Then I needed to download Xcode and accept the Apple developer agreement. This part took the longest.

Once your “File” > “Build Settings” looks like this you’re ready to build for iOS with Xcode. Save the build in your project folder.

Then, I opened my newly built Xcode project by double-clicking the file with the “.xcodeproj” extension. Once in Xcode, I connected my device (in this case, my iPad) to my computer and selected it in the top drop down. I updated the app name, version number, and build but most importantly I chose “Personal Team” on the “Signing & Capabilities” tab. This basically means that I’m making this app for personal use and don’t intend to submit it to the Apple App Store.

All that’s left is to press the play button in the upper left of the window and the Unity app built to my iPad.

When I first tried to use my Unity app I got an “Untrusted Developer” pop up. I was able to trust myself as a developer by going into my iPad’s general settings. I also had this super weird bug in the first couple builds of this project that our feet seemed to be sensored (they weren’t showing up in our app). I had to change the video’s codec in Unity and keep the alpha values to have the iOS build match what I was seeing while developing in Unity on my computer.

Final Product

Conclusion

There are a lot of things to consider when making a multi-media installation like this. We tried to keep the design as self-contained as possible but there are scenarios, like when the iPad needs to be charged, we didn’t think of. Also, the iPad Unity project crashes way quicker than the project on the computer when too many grapes are spawned at once. We could reconsider how viewers interact with our box and how we “make wine” in Unity.

On the fabrication side we had metal brackets for installing the frame on our physical box but didn’t end up all that together yet because we realized we wouldn’t be able to stand the box upright anymore. If this was installed in an exhibit somewhere it would definitely need to be hung on the wall at eye level (with the frame attached).

I kind of really love this weird project we thought up and built! And I also really enjoyed working with Elif! I learned so much about making things in Unity and some more about making things in real life.

Resources

https://www.pexels.com/video/blue-sky-video-855005/

https://www.istockphoto.com/photos/mirror-ball-texture

https://www.youtube.com/watch?v=KG2aq_CY7pU

https://www.youtube.com/watch?v=KlWPedIvwuw

https://www.youtube.com/watch?v=rdvyelwSnLM

https://answers.unity.com/questions/1220094/spawn-an-object-and-destroy-it.html

https://answers.unity.com/questions/1074165/how-to-increase-and-decrease-object-scale-over-tim.html

https://www.youtube.com/watch?v=Z-gija1aAhw

https://stackoverflow.com/questions/65978459/unityengine-videoplayer-not-rendering-video-on-ios-devices

[ITP: Hypercinema] Cornell Box Planning

Group member: Elif Ergin

Cornell Box Inspiration

Joseph Cornell was an American artist who created little dioramas in shallow wooden boxes using found objects: trinkets, pages from books, birds, etc. They’re surrealist in nature and are meant to keep little wonders.

Ideation

Elif and I met up two weeks ago to come up with an idea for our box. We were trying to brain storm to separate themes: summer and dreams/memory. We just scribbled down the imagery or concepts those ideas evoked. We also both decided having a fabricated part to our project was important to us. Also, the Cornell Boxes we looked at for reference have a kind of dark, spooky, whimsical feel to them, so I think were looking to achieve something like that as well. The wonder!

We refined our ideas and landed on a “Endless Summer” Cornell Box. This was a really free-from collaborative sketch. We want our Cornell Box to live within a mirrored cabinet (not sure if it’s physical or virtual yet). The viewer will be able to navigate through different summer scenes/imagery reflected in a big eye ball. At the end of the animations there will be a ferris wheel (iris) and it will hopefully spin in reverse and start at the beginning of the animation. I’m not really sure if we can make all this work because I don’t have much experience with Unity.

Our next step is to start collecting assets. We will look on the Unity store but we’d also like to include our own personal images and maybe find a way to include real-life found objects in our box composition.

Other

I feel like I’ve got a much better grip on working with Unity after completing the Roll A Ball tutorial. I did not expect to be coding so much to get this game working! I definitely learned a lot, but I don’t think our Cornell Box will be interactive in the way this game is.

I also played Gone Home over break and finished it with my boyfriend. I am not a gamer by any means, so it took me a while to get through. I finished/won the game, but only got 1/10 achievements… can you believe that?! How does that work haha

[ITP: Hypercinema] Characters in AR

Group members: Olive Yu and Manan Gandhi. You can see my previous blog post here.

From Adobe After Effects into Adobe Aero

Now that the animations were done we could think about getting them into Aero. To do that, you need to render the animation as a PNG image sequence with the RGB + alpha channels enabled so that it’s on a transparent background. This will export as a folder with a bunch of png images.

Those folders need to be zipped up and transferred into your phone’s Aero files folder. In Aero you can place your character on top of a surface and “play images” (the animation) on a given trigger. Below are some simple tests:

Below is the design tree I wanted cross walk man to follow in our AR app but it wouldn’t prove to so simple. The three animations are separate and there’s no way to change animations on a given trigger. So you have to populate the AR app with all three animations and show/hide them at the right trigger points which is kind of buggy.

With that in mind, this is what the state machine actually becomes. It’s much more complex!

Working within Aero on my iPhone proved to be kind of difficult. It was kind of difficult placing the animations in space and lining them up was never perfect. The stack up would look different in different environments/scales. Also when previewing the app, the walking animation would regularly bug out. Below is the sequence I ended up with for the app.

Finishing Touches

Lastly, I added in the sound that the NYC crosswalk signals make. I wanted to make the crosswalk man move in space as the walking animation was playing but I wasn’t quite sure if I should do that in After Effects or in Aero.

Field testing it was funny. I felt kinda awkward setting up Aero scenes in public, I didn’t want people thinking I was trying to film them or something. The table-top app didn’t translate super well to the real world or on the street.

table top app didn’t translate super well to real-world, on the street

aero didn’t want to grab onto the horixontal surface of the cross walk sign. doctored the video in after effects

Final Product

Here’s a link to the final app. I also created this little composition with my animations in Aero to depict a possible day in the life of the cross walk man. All the scenes were recorded in Aero but the it didn’t recognize the horizontal surface of the sign itself, so I did doctor that clip in After Effects. Ta da!

[ITP: Hypercinema] Character Design

Group members: Olive Yu and Manan Gandhi

Inspiration

For this project we wanted to bring the signs of New York City to life. I decided to choose the cross walk man as my character contribution. I first found a reference image online and drew it up in Adobe Illustrator, making sure each part of the character was on its own layer for animating later. I wouldn’t say drawing complex images in Illustrator is my strong suit, so this simple walking man was good for me to start with.

When designing a character you have to think about its personality, wants, needs, and how it interacts in the world. We knew this project would ultimately end in an augmented reality (AR) app/experience so I thought through the possible interactions. Obviously my cross walk man needed to walk. I also thought it would be kind of funny if these cross walk characters were easily angered or impatient because they direct traffic all day and New Yorkers don’t seem to listen to them. And to switch it up, cross walk man could show some happy emotions as well. So the animations were: walking, angry, and dancing.

Animating in Adobe After Effects

Ok, I really didn’t know ANYTHING about After Effects until having to do this project. The tutorials linked below were super helpful to teach me how to use the intimidating interface and how to rig and animate my character.

I’ve not done much animating in the past but I didn’t find the interface extremely intuitive. Basically the process involves updating parameters for specific items and creating keyframes on the time line. For the walking animation, I mostly moved and rotated the separate layers (body parts) of my character and recorded their position in time. I did some parenting so that specific body parts would move with others like real bodies do. I also applied the “easy ease” effect to the position parameters so that the body movement had an organic velocity.

Making sure that all the body part movements lined up and that the final animation looped took some time. This was the hardest sequence to animate.

The following animations were easier. The angry man movement came out of some messing around with the puppet position pin tool. You can set an anchor point and After Effects creates a mesh on the character’s image. I also didn’t need to record keyframes for this animation because there’s a handy function that can record your puppet pin movements in real-time!

I followed a tutorial to get the dancing man wiggle for the last animation. I used the “wave warp” effect. This dance routine was inspired by Squidward ofc.

Walking man

Dancing man

Angry man

Here are my completed animations. I will say it is really important to know the difference between a project, composition, and pre-composition in After Effects. I think I had an issue with animating my man in the pre-composition editor and was super confused about why my composition was messed up…

Side Quest

I didn’t really feel like this was the most compelling character I could’ve designed, so I kind of tasked myself with doing this same project with a character that was a bit more complex and would teach me a few more Illustrator skillz.

I am basically my mom’s personal story illustrator and I thought an AR app could be a really interesting piece of marketing material. She wrote this really cute short story about a sleepy, hungry, semi-corporate sloth and it was fun making up what this character would look like in his world. Like any good illustrator I did my research and pulled from people I know personally to design this character.

Here’s the final result! I really wanted to explore adding different textures and patterns digitally. I partially used my iPad to draw Mr. Sloth. I can be a graphic designer too! Now let’s see if I ever get around to animating him and putting him into AR…

[ITP: Hypercinema] Stop Motion

Group member: HyungIn Choi

You can find my brainstorming blog post here.

Process

For this assignment, HyungIn and I were tasked with creating two looping stop motion animations. To optimize our time, effort, and to be sure we both got to get our hands onto the animation and creative process we both kind of designed and directed our own animations and helped each other with execution and filming.

Following my story board from last week, I wanted to make a jack-o-lantern loop. Short of getting a physical pumpkin, paper seemed like the medium of choice. At first it was daunting to hand cut all the shapes for my animation but it ended up not being so bad. Hand cutting the shapes for each frame gave me more control in how smooth animation ended up. I was able to tape certain parts down and move one thing frame by frame. I shot the images using my iPhone and an overhead tripod.

HyungIn and I were working in parallel and took over a full classroom over the weekend. We helped each other ideate and shoot our photos. Below are some BTS shots of the aftermath of shooting our stop motion loops.

Premier

I followed this tutorial to make my video in Adobe Premier instead of Stop Motion Studio. Here are the settings I used:

  • Still image default duration: 4 frames

  • 23.976 frames per second

  • Frame size: 720 by 480 (4:3)

  • Exported as a .gif and QuickTime (.mov, “Apple ProRes 422 HQ”)

Final Product

Here’s the animation that Hyungin directed. It’s in a completely different style using found objects but the effect it has is more organic, abstract, and lively than the pumpkin piece.

Conclusion

I really enjoyed making this stop motion loop with paper. It was much easier than I thought it would! One thing I’ve been consistently having issues with is lighting photos properly. As you can see in the loop, the lighting changes and by the end the color balance is totally different than in the beginning of the loop. I’m also running into this issue when taking pictures of my ITP projects in general. Whenever I try to take a straight-above portfolio picture on the floor there’s always a shadow no matter where I move my setup.

Resources

https://www.youtube.com/watch?v=82RM7ZpldxM

https://www.youtube.com/watch?v=6isAwak22O4

[ITP: Hypercinema] Stop Motion Animation

Inspiration

I really love animated movies and shows so I’m really excited that the next assignment is a looping stop motion animation. When I think of stop motion a lot of my favorite Tim Burton, Wes Anderson, and Aardman Animations movies come to mind. To get into the fall spirit my assignment partner Hyungin and I decided to make our animations following a Halloween theme.

Storyboard

This should loop flawlessly because it will start and end with a plain pumpkin. The green arrows indicate the movement for that scene. Some other ideas I had were a ghost fading into a scene or dancing skeletons.

Materials and Next Steps

The task of making a stop motion animation feels really daunting to me because I’m not sure how many frames I’ll need and how hard it will be to set up the scene. Will the images flow smoothly when I put them all together?

I found this creator that makes stop motion using paper. I really like the look and feel of the material but am not sure how hard it will be to cut out these organic shapes out. Claymation seems fun as well but am not sure how that would work out. I guess the easiest solution would be to find a pumpkin and try to modify it’s face somehow (paper or clay?) …

[ITP: Hypercinema] Synthetic Media

Group members: Olive Yu and Yuke Ding

Inspiration

The inspiration for our synthetic media project are those cheesy wooden signs used for decor. The phrases written on them are sometimes so absurd that they already seem like AI wrote them. We wanted to see what phrases we could generate that were just strange enough to be believable inspirational or personalized decor.

Process

First I went through Hobby Lobby’s site of existing signs for sale and compiled a data set of phrases. You can find my data here if you’re curious what kinds of quotes Hobby Lobby is putting on their decor. I intentionally skipped most of the religious ones. Then I uploaded the dataset to Runway ML’s GPT-2 model and saved the most interesting output. Below is a list of some of my favorite phrases that were generated:

  • Home is where you hang your crazy antlers Mubarak Mubarak

  • Keep up all the good and bad things Act like a noble heart

  • By doing what God is all you have in front of you right now

  • I’ve never loved you so much, because we have zero friends

  • ((please don’t)kinship lilac lipsticks sneakers LOL LOL lol

  • Feel your life amaze you and love so much more than you know

  • Pray about your education, and send ideas and ideas to work

  • My mother is brave. Those who inspire me to act as humans must

  • What you’re not good at? What you’re good at? What you’re good

  • Don’t be afraid of your goal ;) Gneromy サベー Mother is the evil

  • Beware of… well, just beware Socrates. Life is better with a cat

  • Give me a ride home I don’t know if you want my message or not

  • Doesn’t it make you bickering sometimes better than you think?

  • Happy construction Zodak’s achievement is his atonement

  • It’s simple and it helps you think about things.

  • Beware of, you can’t make things anymore Hit the hickering fun

  • Homestead is where you eat the food you go.

  • Not over the years I know of this, there is only one way.

  • Life will always be fresh and fun

  • For me, a proud camper lives here with his beaut

  • Love love football player god baseball player god baseball play

  • Phantoms, demons and demons are your specialty

  • In a field of roses I will do what others don’t

  • Love what you do Be fearless Be courageous All things make you

  • For dogs is play, be with them, hang out with them, read books

  • I feel how you feel in life. Unless you can be a dragon

  • What brings you into the world? What makes you different?

  • Hello Girl, I am the best person

  • Welcome to the house of the earth

  • Caring for your kids is much more motivating than shouting at them

  • One bad player makes me perfect. Three good players makes me per

  • Maybe there’ll be no love in heaven

  • You want to be more productive and productive, you want to be

  • The cottage is where I go to bed, you know that

  • Spice Extra garnet A bionic body will be easy to look at

  • Your most beautiful is your wildflowerosity

  • We all have a very good place where we sleep and sleep.

  • Be the people who you are. Somebody did a piece of serious shit

Then we realized that we would physically make these signs in the ITP shop. We each picked our favorite phrases to laser cut. I put my three favorites into Adobe Illustrator and tried to mock up some fictional signage. We each laser cut our signs on wood and added a bit of string for hanging.

Final Product

Conclusion

I feel like this project is a simple yet effective application of synthetic media. We took existing phrases and fed them into the GPT-2 model as a reference. It’s kind of crazy how real some of the generated text that came out sounds. Sometimes it’s really funny, or ominous, or doesn’t make much logical sense, but I think that kind of works for this application.

Resources

https://app.runwayml.com/models/runway/GPT-2

[ITP: Hypercinema] Synthetic Media Example

I do not really follow the trend of AI generated art; I generally prefer my art made by humans... but can you really tell the difference? I wasn’t familiar with synthetic media until just recently but I realized that I’ve been exposed to much more synthetic media than I thought. Synthetic media is the artificial production and manipulation of data and media by automated means such as for the purpose of misleading people. Here’s the general approach:

https://vriparbelli.medium.com/our-vision-for-the-future-of-synthetic-media-8791059e8f3a

For being such a hater I can’t believe I didn’t realize that I follow a piece of synthetic media on Instragram: @lilmiquela. She is a robot living in LA with real-life friends. Of course she’s VERIFIED. I was totally perplexed and fascinated when the evil Insta algorithm recommended her account to me, I just had to see what she was up to. Her account is just like any other influencer’s. She advertises products, drops singles, and lets us into her fabulous life that she shares with her human, celebrity, and robot friends.

I consider the Miquela account synthetic media because she’s a computer generated robot/person/account; she’s not real (right?!). I always just assumed that the people that run her account set up these shoots using a live model to stand-in for her body and then superimposed a computer-rendered image of her face with the matching facial expression. I’m not really sure how they do it. I feel like the way this account is being run currently is really fun, light-hearted, and kinda artistic. It’s entertaining to see what the life of a robot amongst humans could be like. This robot imitating life is a quirky piece of speculative design.

I imagine people do fall for her advertising tho. Influencers do influence and we live in a time where people do what strangers (or even robots) on the internet tell them to do sometimes. I feel like as long as the messaging of this account doesn’t change I think this kind of synthetic media can be harmless.

Resources

https://en.wikipedia.org/wiki/Synthetic_media

https://blog.paperspace.com/2020-guide-to-synthetic-media/

https://www.instagram.com/lilmiquela/

[ITP: Hypercinema] Sound Vacation

Group members: Yizhi Liu and Joann Myung

Assignment and Ideation

For this week’s Hypercinema assignment my group and I decided to create a sound vacation in Adobe Audition. After some brainstorming we landed on a three-part vacation through all of our hometowns. So that we could all learn the software each of us were responsible for out part. Here’s a bit on my process!

Assignment details

My initial brainstorming

So I like to say that Boulder, CO is my home. Anyone that’s been there knows that it’s a very laid-back, natural, magical, and unique place. The first thing to do was to think about what Boulder sounds like.

Here are some sounds I thought of:

  • Boulder creek

  • Rustling trees, wind

  • Birds chirping

  • Rising sun and mountains

    • What would sound-less sounds sound like?

  • People

    • Kids playing in the water

    • Chatting in a coffee shop

  • Bikes, beer, hiking?!

What’s the feeling or mood?

  • Homey, dreamy, comfy, cozy, peaceful, whimsical

Process

Since I wasn’t sure how I would get nature sounds in the city, I started by browsing for free sounds on freesound.org. That’s where I found the bird chirps, wind chime, low hum that is supposed to symbolize the steadiness and strength of the mountains, amongst many other sounds. I only used sounds that were licensed under creative commons in my project.

Next, I ran around The Battery with a Zoom recorder hoping I could get some nature sounds in New York. To recreate the creek that runs through Boulder, I recorded the water and a fountain but neither of those sounded very creek-like. I got some pretty good chirpy-bug clips but I didn’t realize how hard it would be to get an isolated sound in the city; there’s always a helicopter flying overhead or construction going on or a walking tour going by.

There’s a pretty big coffee and beer culture in Boulder and Trident Booksellers is a staple. It was absolutely my favorite place to hang out in town and I spent most of my time there. I had a long recording of ambient cafe noise on my computer for a project I did in my undergrad, so I was excited to use an authentic clip in my sound journey.

Audition

At this point, I had more than enough files for a 30 second composition. I parsed through my zoom files, trimmed them, and decided which sounds to use. I wanted the mountain humming and the wind (chimes) to be a major theme of my sound vacation and I liked the mix of natural and some unnatural sounds. I also added some film photos I took of my town to our presentation as an added visual.

Bringing it all together

Joann, Yizhi, and I all met up to put together our separate parts. We mixed together our individual vacations in Audition and added some fading to transition between movements. Here’s a link to our presentation.

Final Product

My Boulder “staycation” mix in Audition

“Staycation” photos

Here are some snapshots of my contributions to the group project. I uploaded my sound vacation to Boulder to Soundcloud. You can also access all my files, sound clips, and Audition sessions at this GitHub repo. Sound clips I got from freesound.org are named “FS-x”.

Conclusion

I’m not really a big music-making person, but I am pretty proud of what I came up with for this project. I feel like I planned out and thought about every step of the process. I had a lot of fun exploring the Battery and getting down to the water. It may have taken me much longer to get down there if it wasn’t for this project. I also like that I could repurpose some of my own old photos that I haven’t had a chance to use for a photo project yet.

[ITP: Hypercinema] Sound and Space: Audio Scavenger Hunt

In our first week of class we were introduced to recording with the Zoom Recorders and microphones. I worked with Anna Nikaki to find sounds that embodied the prompts below:

  • The feeling of loneliness

  • The feeling of happiness

  • The sound of betrayal

  • The sound of cold

  • A hum

  • A metal sound

  • A ticking sound

  • The sound of purple

  • Squishiness

I was not able to upload the .wav files to this blog directly, but you can download them from my github repo.